
craftsman 1/2 hp garage door opener manual model 139
Craftsman 1/2 HP Garage Door Opener Model 139: A Comprehensive Guide
Sears Parts Direct offers manuals and diagrams for Craftsman 139 garage door openers, aiding repairs and providing essential owner information for model 139․
Understanding the Model 139 Opener

The Craftsman 1/2 HP Garage Door Opener, Model 139, is a popular choice for homeowners seeking a reliable and efficient garage door operating system․ This opener, frequently discussed in online forums and supported by resources like Sears Parts Direct, provides a balance of power and affordability․ It’s designed for single-car garages and offers standard lifting capacity․

Users often seek the manual for troubleshooting, installation, or understanding specific features․ While resembling the functionality of Minecraft, it focuses on practical home improvement․ Accessing the manual is crucial for safe operation and maximizing the opener’s lifespan, ensuring smooth and secure garage door functionality for years to come․
Safety Precautions & Warnings
Craftsman 1/2 HP Model 139 garage door openers require strict adherence to safety guidelines․ Always disconnect power before servicing․ Never allow children to operate the opener or play near the door․ Regularly test safety features like the auto-reverse function, detailed in the owner’s manual․
Improper installation or adjustment can lead to serious injury․ Refer to Sears Parts Direct for diagrams and support․ Be mindful of pinch points and ensure clear pathways․ Ignoring warnings can compromise the system’s reliability and create hazardous conditions, similar to navigating a complex building craft game․
Component Identification

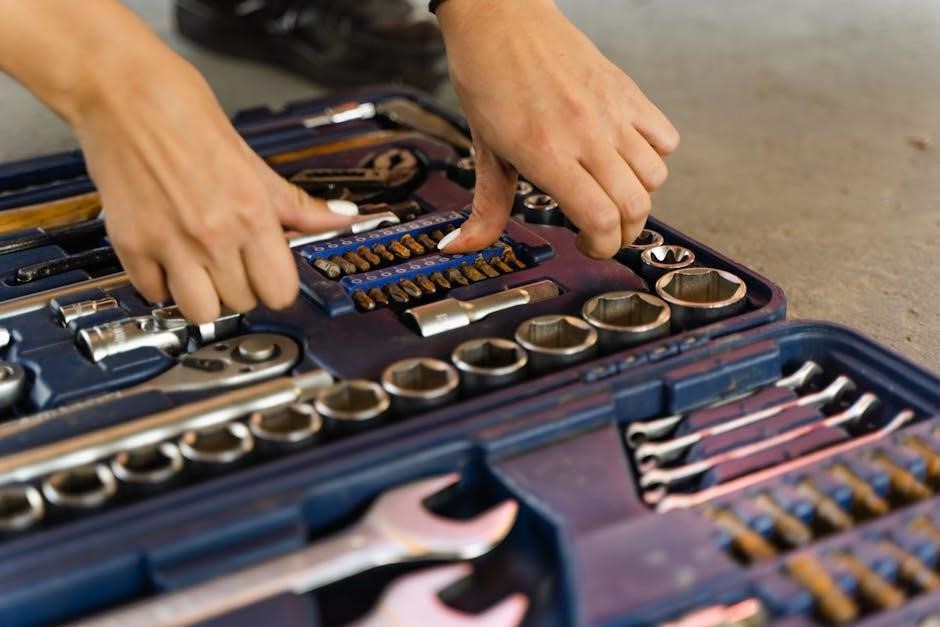
The Craftsman 1/2 HP Model 139 opener consists of a motor unit housing the power system, a rail system transmitting motion, and door brackets securing the door․ Key parts include the remote receiver, safety sensors, and chain/belt drive․ Sears Parts Direct provides detailed diagrams illustrating each component’s location․
Understanding these parts is crucial for maintenance and repair, much like identifying building blocks in a crafting game․ The manual details specific component functions, aiding in troubleshooting and replacement․ Proper identification ensures correct part ordering and successful repairs․
Motor Unit
The Craftsman 139’s motor unit houses the ½ HP motor, responsible for lifting and lowering the garage door․ It contains the logic board controlling operation, the receiver for remote signals, and safety features like the limit switches․ Sears Parts Direct diagrams clearly show internal components․
This unit’s casing protects internal parts from the elements․ Regular inspection of the motor unit is vital, checking for unusual noises or overheating․ The manual details safe access for inspection and potential repairs, ensuring optimal performance․
Rail System
The Craftsman 139’s rail system guides the door’s movement, connecting the motor unit to the door bracket․ Typically constructed from steel, it features a chain or belt drive․ Sears Parts Direct provides detailed rail system diagrams for easy part identification and replacement․
Proper alignment is crucial for smooth, quiet operation․ The manual emphasizes checking for loose bolts or bends in the rail․ Maintaining correct tension in the chain or belt is also vital, preventing strain on the motor and ensuring reliable performance over time․
Door Bracket & Hardware
The Craftsman 139’s door bracket and accompanying hardware securely attach the garage door to the rail system․ This connection is critical for safe and efficient operation․ Sears Parts Direct offers replacement brackets and hardware components, ensuring compatibility with your model․
The manual stresses inspecting these parts for wear or damage, particularly the rollers and hinges․ Proper lubrication of these components minimizes friction and noise․ Correctly tightened hardware prevents unwanted movement and maintains the door’s structural integrity, contributing to long-term reliability․
Installation Instructions
Installing the Craftsman 139 requires careful adherence to the owner’s manual for safety and optimal performance․ Begin by securely mounting the motor unit, ensuring adequate support and clearance․ Next, assemble the rail system, aligning it precisely with the door’s path․
Attaching the door bracket correctly is paramount; Sears Parts Direct provides diagrams to aid this step․ Double-check all connections and hardware tightness before proceeding․ Improper installation can lead to malfunctions or safety hazards, so meticulous attention to detail is crucial․

Mounting the Motor Unit
Securely mounting the Craftsman 139’s motor unit is the foundational step of installation․ The owner’s manual details proper placement, emphasizing adequate ceiling height and structural support․ Utilize the provided mounting brackets, ensuring they are firmly attached to ceiling joists․
Verify the unit is level before fully tightening bolts․ Sears Parts Direct diagrams illustrate correct bracket positioning․ Incorrect mounting can cause excessive vibration and noise, potentially damaging the opener or garage structure․ Prioritize a stable and secure installation․
Assembling the Rail System
The Craftsman 139’s rail system requires careful assembly, as detailed in the owner’s manual․ Connect rail sections, ensuring proper alignment and secure locking of all joints․ Pay close attention to the curvature of the rail, especially near the door․
Sears Parts Direct provides visual diagrams to aid in this process․ Incorrect rail assembly can lead to binding or uneven door travel․ Verify smooth operation throughout the entire length of the rail before proceeding․ A properly assembled rail is crucial for quiet and reliable performance․
Attaching the Door Bracket
Securely attaching the door bracket is vital for safe operation of your Craftsman 139 opener․ Consult the manual for correct bracket placement based on your door type․ Use the provided hardware, ensuring bolts are tightened to the manufacturer’s specifications․
Sears Parts Direct offers replacement brackets if needed․ Improper bracket installation can cause the door to separate from the opener․ Double-check all connections before proceeding to programming․ A robust connection guarantees smooth and reliable door movement․
Programming & Adjustment
Proper programming and adjustment are crucial for optimal Craftsman 139 performance․ Begin by programming the remote controls, following the steps detailed in the owner’s manual․ Next, adjust the travel limits to prevent the door from over-opening or closing․

Fine-tune the force adjustment settings to ensure the door reverses safely upon encountering an obstruction․ Sears Parts Direct provides resources for troubleshooting programming issues․ Accurate adjustments enhance safety and extend the opener’s lifespan․
Remote Control Programming
To program a remote for your Craftsman 139 opener, locate the “Learn” button on the motor unit․ Press and release it; the indicator light will illuminate․ Within 30 seconds, press and hold the desired button on the remote until the garage door opener light flashes, confirming successful programming․
Repeat this process for additional remotes․ Consult the owner’s manual for specific instructions and troubleshooting tips․ Sears Parts Direct offers replacement remotes if needed, ensuring convenient access to your garage․

Travel Limit Adjustment
Adjusting the travel limits on your Craftsman 139 opener ensures the door opens and closes to the desired height․ Locate the up and down travel limit adjustment screws on the motor unit․ Use a screwdriver to make small adjustments, testing the door’s range of motion after each turn․
Carefully observe the door’s full travel, avoiding over-adjustment which could cause binding or safety issues․ Refer to the owner’s manual for detailed diagrams and specific instructions for your model․
Force Adjustment Settings
Craftsman 139 openers feature force adjustment settings to control the power applied during door operation․ These adjustments, typically found on the motor unit, dictate how much force the opener uses to overcome door weight and resistance․ Incorrect settings can lead to the door reversing unexpectedly or operating with insufficient power․
Carefully adjust these settings in small increments, always prioritizing safety․ Refer to the owner’s manual for specific guidance and recommended force levels for optimal performance and to prevent damage․
Troubleshooting Common Issues
Addressing issues with your Craftsman 139 opener often starts with simple checks․ If the opener isn’t responding, verify power supply and remote control batteries․ Unexpected door reversals suggest force settings are too low or obstructions are present․ Noisy operation could indicate loose hardware or a need for lubrication․
Consult the owner’s manual for detailed troubleshooting steps and safety precautions․ Sears Parts Direct provides resources for diagnosing and resolving common problems with this model․
Opener Not Responding
If your Craftsman 139 garage door opener fails to respond, begin by confirming a stable power supply․ Check the circuit breaker and ensure the opener is properly plugged in․ Next, examine the remote control batteries, replacing them if necessary․ Verify the wall control button functions correctly․
Consult the owner’s manual for reset procedures․ Sears Parts Direct offers diagnostic assistance and replacement parts if these initial steps don’t resolve the issue, ensuring your opener functions reliably․
Door Reverses Unexpectedly
An unexpected reversal of your Craftsman 139 garage door often indicates a problem with the safety sensors․ Ensure these sensors are aligned and free from obstructions; even dust can interfere․ Check the force adjustment settings, as overly sensitive settings can trigger reversals․
Refer to the manual for precise adjustment instructions․ Sears Parts Direct provides replacement sensors and guidance if realignment or adjustment doesn’t correct the issue, restoring safe and reliable operation․
Noisy Operation
Excessive noise from your Craftsman 139 opener often stems from insufficient lubrication of moving parts․ Regularly lubricate the chain or belt, rollers, and springs – consult the manual for recommended lubricant types․ Inspect the rail system for loose bolts or damage, tightening or replacing components as needed․
Sears Parts Direct offers replacement parts to address worn or damaged components․ Addressing these issues will significantly reduce noise and ensure smoother, quieter operation of your garage door system․
Maintenance & Lubrication
Regular maintenance extends the life of your Craftsman 139 opener․ A consistent inspection checklist should include examining the door tracks, hinges, and rollers for wear․ Lubricate moving parts – chain/belt, rollers, and springs – using a silicone-based lubricant, as detailed in the owner’s manual․
Check belt or chain tension, adjusting as needed to prevent slippage or excessive wear․ Sears Parts Direct provides replacement parts for any worn components discovered during inspection, ensuring optimal performance․
Regular Inspection Checklist
A routine inspection of your Craftsman 139 opener is crucial for safety and longevity․ Begin by visually checking the door tracks for obstructions or bends․ Examine rollers and hinges for wear, ensuring smooth operation․ Inspect the chain or belt for tension and damage, referencing the manual for proper adjustment․
Test the safety reversal system monthly․ Verify all bolts and nuts are tightened․ Sears Parts Direct offers replacement parts if any components fail inspection, maintaining optimal functionality․
Lubricating Moving Parts
Proper lubrication extends the life of your Craftsman 139 garage door opener․ Apply a silicone-based lubricant to rollers, hinges, and the door tracks – avoid oil-based products as they attract dirt․ Lightly lubricate the chain or belt, checking the manual for specific recommendations․
Do not lubricate the motor itself․ Regularly lubricating these components ensures smooth, quiet operation and prevents premature wear, referencing Sears Parts Direct for compatible lubricants․

Belt/Chain Tension Adjustment
Maintaining correct belt or chain tension is crucial for optimal performance of your Craftsman 139 opener․ A loose belt/chain can cause slipping and noise, while excessive tension strains the motor․ Consult the owner’s manual for specific tensioning instructions, often involving adjusting a screw or bolt․
Regularly inspect the belt/chain for wear and tear․ Sears Parts Direct provides replacement parts if adjustment isn’t sufficient, ensuring smooth and reliable operation of your garage door system․

Parts Diagrams & Replacement
Locating replacement parts for your Craftsman 1/2 HP Model 139 opener is simplified through detailed parts diagrams․ These diagrams, often available on Sears Parts Direct, illustrate component locations and part numbers․ When a component fails, identifying the correct replacement is essential for a successful repair․
Sears Parts Direct is a primary resource for genuine Craftsman parts, ensuring compatibility and quality․ Always refer to your owner’s manual for specific part numbers before ordering․
Finding Replacement Parts
Securing replacement parts for your Craftsman 1/2 HP Model 139 garage door opener begins with identifying the specific component needing replacement․ Sears Parts Direct is a key resource, offering a comprehensive catalog of Craftsman parts․ Utilizing the model number (139) and referencing the parts diagrams within your owner’s manual streamlines the process․
Online searches using part numbers also yield results from various retailers․ Prioritize genuine Craftsman parts to maintain opener functionality and safety․
Sears Parts Direct Resources
Sears Parts Direct stands as a primary hub for Craftsman 1/2 HP garage door opener Model 139 support․ They provide access to detailed parts diagrams, crucial for identifying the correct replacement components․ Downloadable owner’s manuals for various Craftsman models, including the 139 series, are readily available on their website․
Furthermore, Sears Parts Direct facilitates direct part ordering, ensuring compatibility and simplifying the repair process․ Their search tools allow pinpointing parts using model numbers, enhancing efficiency․
Identifying Specific Components
When referencing the Craftsman 139 garage door opener manual, precise component identification is key․ Diagrams detail parts like the motor unit, rail sections, door brackets, and safety sensors․ Understanding these visuals aids in accurate repairs and replacement ordering․
Sears Parts Direct’s exploded views further assist in pinpointing specific items․ Common components include the logic board, chain/belt, and various gears․ Correctly identifying these ensures compatibility when sourcing replacements, streamlining the maintenance process․
Wiring Diagram & Electrical Specifications
The Craftsman 139 garage door opener’s manual provides a detailed wiring diagram crucial for safe installation and troubleshooting․ It illustrates connections for the power supply, safety sensors, and remote receiver․ Electrical specifications typically include voltage (120V) and amperage requirements․
Always disconnect power before working with wiring․ Referencing the diagram ensures correct connections, preventing damage or malfunction․ Sears Parts Direct may offer supplemental diagrams, aiding in complex repairs or modifications․ Incorrect wiring can void warranties and pose safety hazards․
Manual Download Locations
Finding the Craftsman 139 garage door opener manual is straightforward․ Sears Parts Direct is a primary source, offering downloadable PDFs for various Craftsman models, including 13953918D and 139653000․ Manualzz also hosts user manuals, providing access to older versions and related documentation․
These online resources allow convenient access to installation instructions, troubleshooting guides, and parts diagrams․ Searching by model number ensures you obtain the correct manual․ Always verify the manual matches your specific opener variant for accurate information․
Compatibility with Accessories
The Craftsman 1/2 HP Model 139 garage door opener exhibits compatibility with several accessories to enhance functionality and security․ Wireless keypads can be integrated for keyless entry, offering convenient access without a remote․ Furthermore, exploration into smart home integration is possible, potentially enabling control via smartphone apps or voice assistants․
However, specific compatibility depends on the accessory’s generation and the opener’s receiver․ Checking accessory documentation or Sears Parts Direct ensures seamless integration and optimal performance with your Model 139․
Wireless Keypads
Integrating a wireless keypad with the Craftsman 1/2 HP Model 139 provides convenient, keyless entry to your garage․ These keypads allow authorized users to operate the door using a personal code, eliminating the need for remotes․ Compatibility varies; ensure the keypad is designed for Craftsman openers or utilizes a universally compatible frequency․
Programming is typically straightforward, involving entering a learning mode on the opener and then inputting the desired code on the keypad․ Refer to both the opener’s and keypad’s manuals for detailed instructions․
Smart Home Integration
Modernizing your Craftsman 1/2 HP Model 139 garage door opener with smart home integration offers remote control and monitoring capabilities․ Compatibility often requires a compatible smart hub, such as those utilizing Z-Wave or Wi-Fi protocols․ Adapters or bridge devices may be necessary to connect the opener to your chosen smart home ecosystem․
Once connected, you can control the door via smartphone apps, voice commands (using assistants like Alexa or Google Assistant), and create automated schedules․ Always consult the opener’s manual for specific integration guidance․